Using `bslib` variables to stylize shiny
Source:vignettes/style_shiny_app_bslib.Rmd
style_shiny_app_bslib.RmdIntroduction
In this example we will start by adding styles to a ‘Figma’ file.
Then we will use these variables to define the high level
bslib variables used for stylizing Shiny applications.
Initial Steps
In order to get style data from a ‘Figma’ file using the REST API the following steps should followed:
Create a Figma team
Create a Figma file and move it to the Figma team
Add your favorite styles (they should appear in the Design selection at the top right of your screen)
Click Assets on the top left and select the book icon to publish your styles.
Adding Bootstrap variables - bslib
The bslib library allows to manipulate the theme of a
shiny application using bootstrap variables. In these example we
demonstrate how to use high level bootstrap variables to stylize your
application.
The high level bootstrap variables are the arguments of the functions
bslib::bs_theme.
rlang::fn_fmls_names(bslib::bs_theme) %>%
  tail(-3)
#>  [1] "brand"        "bg"           "fg"           "primary"      "secondary"
#>  [6] "success"      "info"         "warning"      "danger"       "base_font"
#> [11] "code_font"    "heading_font" "font_scale"   "bootswatch"
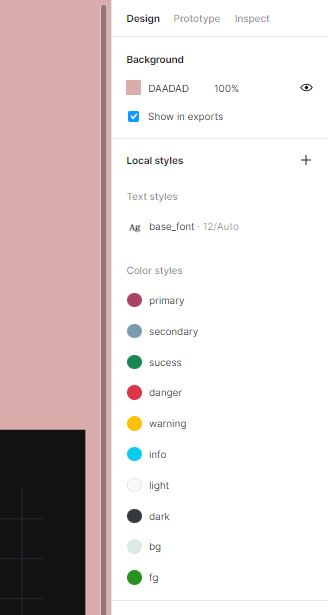
By using these names as style names into a ‘Figma’ file we can directly manipulate the theme of the Application.
Open the ‘Figma’ file and insert the styles of your choice using
blib variable names as printed from the previous chunk. On
the right hand side of your screen you should get a View similar to the
following:

After defining some of the variables that you want to modify navigate
to the top left and select Assets. Then, push the book button to publish
the changes on the file. Now the file is ready to be accessed from an R
session using Rigma.
Extract data to R
We can access published data via ‘Figma’ REST API. Find the file id in the URL of the ‘Figma’ file. Then, collect style data:
file_key <- "sFHgQh9dL6369o5wrZHmdR" #add your own file_key
style_data <- file_key %>%
  Rigma::get_file_styles() %>%
  Rigma::as_design_tibble()
The color is encoded in thumbnail URLs provided by the API
(alternatively you can get color metadata from node ids and using the
Rigma::get_file_nodes() method). For this tutorial, we
include an example function that collects color data using the thumbnail
URLs, add_color(). We can get high level bslib
color variables by executing:
bslib_palette <- style_data %>%
  Rigma::add_color() %>%
  Rigma::extract_bslib_palette()
Text data
Metadata about text can be extracted using the following function:
text_data <- Rigma::text_data_from_styles(style_data)

#get base_font Figma style variable - see also snapshot
base_font <- text_data %>%
  filter(name == "base_font") %>%
  pull(fontFamily) %>%
  font_google()